Have you ever opened an app or website and thought, “Wow, this looks great and is super easy to use!”? That’s the magic of UI (User Interface) design at work. From buttons to navigation menus, UI design plays a key role in making digital products user-friendly and visually appealing.
In this blog, we’ll break down the What is UI Design Process step by step, so even beginners can grasp the concept with ease. Plus, we’ll use real-life examples to make everything clearer.
What is UI Design?
Before we dive into the What is UI Design Process question, let’s define what UI design is all about. UI design is the practice of designing the layout, interactive elements, and visual aspects of an interface that a user interacts with. This includes buttons, icons, menus, text fields, colors, and overall layout.
The goal of UI design is to create an interface that is easy to use, visually appealing, and in line with the product’s purpose and branding.
For example, think about the Instagram app. The interface includes buttons to like, comment, and share posts, a search bar, and a navigation bar that makes it easy to move between the feed, explore page, and profile. All of these design elements are carefully thought out to ensure that users can navigate the app without frustration.
What is UI Design Process?
The UI design process involves a series of steps that designers follow to create a functional and aesthetically pleasing user interface. Whether you’re designing a website, mobile app, or software, understanding the process is essential to creating effective and user-friendly designs.
Let’s walk through the key stages in the What is UI Design Process with real-life examples to help you get a better understanding.
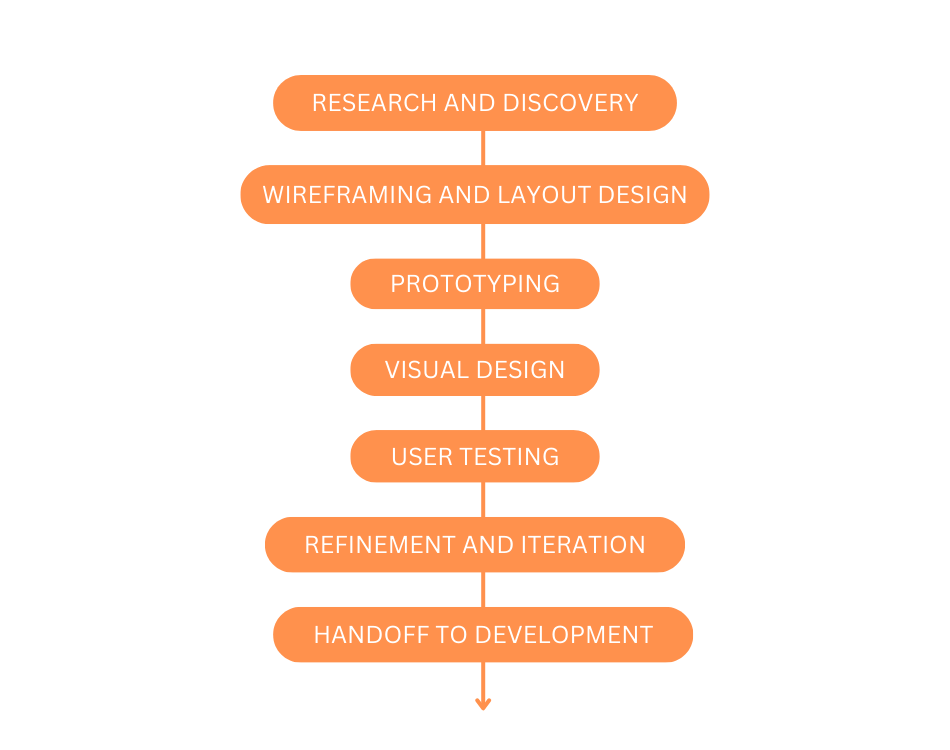
Step 1: Research and Discovery
The very first step in the UI design process is to gather information. This phase involves understanding the users, their needs, and the context in which the product will be used. The goal here is to gather as much information as possible to inform the design process.
Real-Life Example:
Let’s say you’re designing a travel booking website. In this research phase, you might conduct surveys or interviews with people who frequently book flights and hotels online. What frustrates them about the booking process? What features do they look for in a travel website? This information helps create a clear vision for the design.
Key activities in this step include:
- Understanding your target audience
- Analyzing competitors
- Reviewing user feedback
- Identifying business goals and objectives
Step 2: Wireframing and Layout Design
Once you have a good understanding of the user and the goals, it’s time to begin the structural design. Wireframing is where you sketch out the basic structure of the user interface. Think of it as a blueprint for the interface that shows where the main elements will go, without getting into detailed design elements like colors and fonts.
Real-Life Example:
If you’re working on a food delivery app, at this stage, you’ll design a wireframe showing where the “menu,” “cart,” and “order” buttons will go on the screen. The wireframe helps define the layout and flow of the app before diving into the visual elements.
Wireframes can be simple sketches on paper or digital representations, and they’re essential for defining the app’s structure.
Step 3: Prototyping
Now that you have a wireframe, it’s time to turn it into an interactive prototype. A prototype is a working model of the design where you can click, tap, or scroll through the interface as though you were using the actual product. Prototypes allow you to test user interactions and get a feel for how the final product will work.
Real-Life Example:
If you’re designing a news app, the prototype would let you interact with it by swiping through articles, clicking on headlines, and navigating between categories. This is where you can see if the interface flows smoothly or if there are any hiccups that need to be addressed.
Prototyping tools like Figma, InVision, or Adobe XD can help create realistic prototypes without needing to build the actual product.
Step 4: Visual Design
This is where the magic happens—adding colors, typography, icons, and branding elements to the wireframe and prototype. The goal is to create a visually appealing design that aligns with the brand’s identity and enhances the user experience. This step focuses on the aesthetics of the interface while maintaining functionality.
Real-Life Example:
Let’s say you’re working on a fitness tracking app. For the visual design, you might choose bold, vibrant colors like green or blue to represent energy and health. You’ll pick a readable font, and use icons to represent different workouts or progress. The goal is to create a design that looks professional, is aligned with the brand, and is easy to navigate.
During this phase, designers also ensure that the visual hierarchy is clear, meaning important elements are more noticeable, while less crucial items are more subtle.
Step 5: User Testing
User testing is a critical step in the UI design process. Even the best-designed interfaces can have flaws, and user testing helps identify issues that might not have been noticed during the design process. This step involves getting feedback from real users as they interact with your prototype.
Real-Life Example:
You might create a prototype for an online shopping app and ask users to complete tasks like adding an item to the cart and checking out. If users have trouble finding the checkout button or don’t understand how to apply a coupon code, these issues can be fixed before launching the app.
There are many ways to conduct user testing:
- Usability testing (having real users perform tasks)
- A/B testing (comparing two design variations)
- Surveys and feedback
Step 6: Refinement and Iteration
Based on the feedback from user testing, the design goes through revisions and refinements. This step is about making improvements to ensure that the interface is user-friendly and free from any obstacles or confusion. The UI design process is rarely linear—refinements and changes are made over time, often after multiple rounds of testing.
Real-Life Example:
If users report that the search feature on your e-commerce website is too difficult to use, you might make it more prominent or add filters to improve usability. This is part of the iterative process, where you continually refine the design based on real-world feedback.
Step 7: Handoff to Development
Once the design is finalized and fully tested, it’s time to hand it off to the development team. In this phase, the UI design files, specifications, and guidelines are passed to the developers who will bring the design to life. They take the visual design and prototype and turn it into a fully functional app or website.
Real-Life Example:
You’ve designed a new music streaming app, and now it’s time for the developers to implement the design into code. You provide them with details like font sizes, button dimensions, and color codes so they can build the app according to your design specifications.
Conclusion: Why Understanding the UI Design Process Matters
Understanding the What is UI Design Process is key for anyone interested in creating digital products, whether you’re a designer, developer, or business owner. UI design plays a critical role in making products that users love to interact with. By following a structured design process—from research and wireframing to prototyping, visual design, and testing—you ensure that your design is intuitive, functional, and visually appealing.
So next time you use your favorite app or website, take a moment to appreciate the thought and effort that went into its design. And if you’re ready to dive into UI design yourself, the What is UI Design Process is your guide to creating amazing digital experiences.
By breaking down the What is UI Design Process with easy-to-understand steps and real-life examples, we hope you now have a clearer understanding of how designers create beautiful, functional interfaces. Ready to start designing? Happy creating!